Click here to see the list of changes.
This rule, when added to a session, monitors every LLCR-compatible locomotive in it. If the locomotive couples with LLCR-compatible cars/coaches, the rule will control their lights.
Why using a rule instead of a scriptlet? A scriptlet is a piece of code permanently embedded into a specific asset and it usually contains very customized code. There are scriptlets interacting with standard functionality of TRS while others require preparing assets some way; for example, coronas for marker lights. As soon as the user places the asset into a layout the script will be started, any single instance (copy) of an asset will have its own instance of the scriptlet running.
Rules are somewhat different; a rule is a piece of code too but it isn't tied up to an asset, the user places the rule into the session and the code will control every asset in it. Like the scriptlet, depending on the way it is programmed, the rule may interact with standard functions or customized ones.
The scriptlet approach is very interesting; it gives the maximum flexibility and power to the creator, as long as he knows how to program.
There are a couple of drawbacks:
A programmer may decide to share his/her code with other creators that (assuming they can't do scripting)
would be constricted to the first or other programmer/s for updates or new functionalities...
Then, given the fact that scriptlets are embedded into the asset, any minor update or correction will require to redistribute the whole asset for letting the older and newer users have the latest version... many Mbytes of stuff travelling up and down for, maybe, just a single line of code having been changed. Not to mention the waste of resources needed for executing the same copy of code for every asset present in the layout.
This does not happen with the rule approach; the user will be still tied up to a programmer for updates and add-ons, but the centralized approach will minimize some of the problems mentioned above; and the assets behaviour will be coherent enough because the code is the same for every asset.
- Changes head/tail lights depending on the direction of the locomotive.
- Monitors couplings/decouplings changing light status accordingly.
- Supports double heads and multiple traction consists.
- Turns on corona headlights by night and under given weather conditions.
- Turns on and off tail lights on coaches/cars.
- Attach a custom flashing device to the end of train if the end is a car/tender.
- Tail devices are always present (if coupled to a locomotive) but the light is switched on and off.
- If a driver must perform a stop while running a schedule/command the rule switches off headlights (a.lightx points) but not corona headlights/marker/tail lights, resulting in "dimming the headlights". After restarting the driver will turn headlights on again.
- Note: Previous feature is applicable only to AI drivers.
- Coronas can be customized per vehicle. Simply change the corona KUID in the vehicle config.txt.
- The creator can model end devices as kind:mesh format and setup light number (maximum two at present), color, frequency of flashing.
- Time and weather conditions are configurable through the rule control panel.
- It is possible to configure whether tail lights must be turned on by daylight in the rain..
- English and Spanish languages supported at present, more will follow.
- Control panel can show up plain text or fancy html with tables and graphics. Change the html_output parameter in the rule config.txt--> string-table, then rebuild the cache.
- Tail lights don't change status upon direction changes. This behaviour is build-in designed.
- Due to the way headlights (a.lightx) are implemented in TRS we don't have full control over them. We decided to limit this control to very few situations, resulting in an uncomplete management of lights...
- Headlights don't react properly to direction changes in DCC manual mode (except if the locomotive is prepared with a.cabback and you go into the cab by keying 1 and then Alt+C to switch the direction, the same applies for Cab mode).
- Sometimes, while jumping into a session from surveyor or (less frequent) from the main screen, the flashing device is visible in every car. We suspect this bug is related to TRS rather than the rule code. Workaround: Exit and reload the session or don't care and begin shunting, first couple/uncouple resets the correct behaviour.
- If a couple happens with throttle 0 lights won't change until a stop or a movement of throttle happens.
- Point a.cabback is reversed in the sample loco, will be fixed on next update

Reference Table (beta 1)
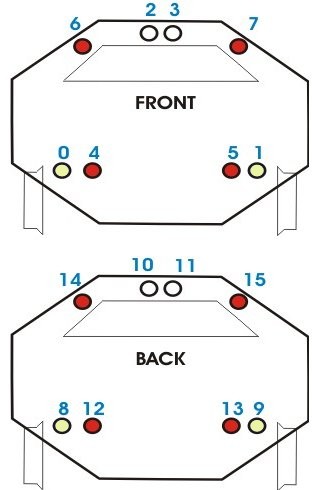
just the ones needed for your light scheme.
At present they works as tail lights only by night
At present they turn on by day and if is raining (depending on which condition the user set).
Wagons make use of attached meshes.
They are used them to simulate light at day and for dimming at night.
They must overlap a.lights points in the loco, not to be used in coaches.
Content creators must configure the mesh table of their locomotives as follows:
    mesh-table
    {
     default
      {
       mesh your_loco_body/your_loco_body.im
       auto-create 1
       effects
        {
         corona0
          {
           kind corona
           att a.corona0
           texture-kuid <KUID:-3:10111>
           object-size 0.075
          }
        }
      }
     shadow
      {
       mesh your_loco_shadow/your_loco_shadow.im
      }
    }
Insert the desired numbers of coronas in the effects section of the mesh
table, optionally give a default texture-kuid for each corona and change its size to
suit your needs.The rule will load coronas dynamically from your locomotive kuid-table, the texture-kuid in the effects section is needed for the static effect visible in Railyard and Surveyor.
Placing correct texture-kuids at this stage will improve the static appearance of your model. For further improvement you can use a null corona (available on DLS) to hide these points that you don't want to be seen by default.
If you don't insert a texture-kuid the corona will default to yellow.
Next step is inserting the following entries in the kuid-table. The rule will search the coronas to be used here; corona_null is unused at run time. As said before the rule will load coronas dynamically from here.
You are allowed to change the KUID but not the identifier, as the name suggests these kuids are related to points on the provided reference table.
You should also add the icon for visual information of vehicle compatibility with this rule.
    kuid-table
    {
    icon_llcr    <KUID:87589:10101>
    corona_light <KUID:-3:10111>
    corona_head  <KUID:-3:10111>
    corona_tail  <KUID:-3:10112>
    corona_tail2 <KUID:-3:10112>
    corona_null  <KUID:87589:10102>
    }
Then add these entries to the locomotive string-table. It is important to insert the same
version numbers of the rule you are using. A superior higher number will not work with
an lower rule version. Lower number will be useful to track potential bugs introduced between
revisions.The LLCR_TYPE parameter may contain these values:
"LOCO" Valid for electric, diesel and steam locotenders.
"LOCO+TENDER" Steamers with separate tender.
"COACH" Although coaches don't use every corona you must fill in the kuid-table the same way as you do with locomotives, current code handling requires so.
    string-table
    {
    LLCR_VER_MAJOR "1"
    LLCR_VER_MINOR "0"
    LLCR_TYPE "LOCO"
    }
Finally the LLCR icon. This icon informs the user that your vehicle is compatible with
LLCR rule. Its KUID was inserted in the kuid-table on previous step. To activate this, include this tag into the config:
icon3 <KUID:87589:10101>
We decided to put the icon last so as not to interfere with other icons that may exist
before. This minilogo for example, as showed on this picture: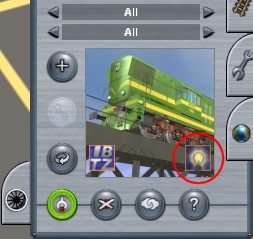
So, the config is over now.
In the mesh you must add several anchor points named a.coronaN where the N matches the corresponding number in the reference table and in your config.txt effects section.
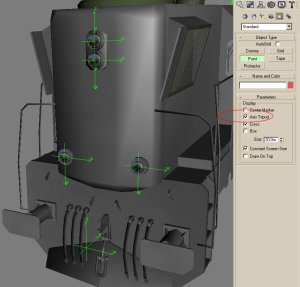
Examine the provided Gmax sources for inspecting various examples.
Car and tender configuration is slightly different, you don't have coronas here but lanterns, FREDs or whatever end device you choose. First of all you must create a couple of devices (car front/back) that will be configured as kind:mesh. Model the device around a fixed point in the car mesh then save to another file recentering the fixed point at 0,0,0.
The config mesh-table will be like this:
    mesh-table
    {
     default
      {
       mesh tail_lantern.im
       auto-create 1
       effects
        {
         corona0
          {
           kind corona
           att a.corona0
           texture-kuid <KUID:-3:10112>
           object-size 0.085
           frequency 2
          }
         corona1
          {
           kind corona
           att a.corona1
           texture-kuid <KUID:-3:10112>
           object-size 0.085
           frequency 2
          }
        }
      }
    }
You are required to mantain the naming convention for coronas and attachment
points (corona0 and corona1) but free to choose the texture, size and
frequency for flashing lights.The following mesh-table is for the car body, in this example we used a.limfront/a.limback as an attachment point but you are free to add your own points if you prefer.
Our best suggestion is to inspect the provided Gmax sources.
Again, you're required to keep the naming convention unchanged (tail_device_front/tail_device_back).
    mesh-table
    {
     default
      {
       mesh your_wagon_body/your_wagon_body.im
       auto-create 1
       effects
        {
         tail_device_front
          {
           kind attachment
           default-mesh <KUID:87589:10132>
           att a.limfront
          }
          tail_device_back
          {
           kind attachment
           default-mesh <KUID:87589:10133>
           att a.limback
          }
        }
      }
     shadow
      {
       mesh your_wagon_shadow/your_wagon_shadow.im
      }
    }
The car kuid-table is slightly different fromt previous samples because we don't
have any corona here:
    kuid-table
    {
    icon_llcr         <KUID:87589:10101>
    tail_device_front <KUID:87589:10132>
    tail_device_back  <KUID:87589:10133>
    }
Same as locomotives for version numbers but LLCR_TYPE must be "TENDER" or "WAGON":
    string-table
    {
    LLCR_VER_MAJOR "1"
    LLCR_VER_MINOR "0"
    LLCR_TYPE "WAGON"
    }
And the LLCR icon to finalize.
icon3 <KUID:87589:10101>
The code in usage is suffering from some limitations due to the interaction between marker, tail, headlights, train end devices and coaches tail lights depending on weather conditions and day/night time, the number of variables make makes implementing a dynamic setup complex, but not impossible though.
However, while adding the various customizable parameters you may find on the control panel we built in that it takes a long effort to make it completely customizable.
Added flexibility for creators and final users turns the code more complex, heavy and less readable by other programmers.
We all know that many aspects of railroads are ruled by standards, this means that at a given era and/or location the lighting behaviour is coherent between vehicles. From a prototypycal standpoint the rule is greatly powerful, it avoids variations in the implementation of lighting, resulting in a homogeneous layout with vehicles acting in a coherent way.
But this coherency isn't just a matter of number of lights and position, somewhere lights are on at day somewhere not, a train waiting for leaving may switch completely off lights or let markers light on and headlights off, or have both on... and so on. Programming a script that is good for all the standards we may found in the world is too much complex.
We think that the best solution is: first create a DCC rule valid for any accidental users/creators and set it up as common standard. Then release the code as GPL open source to let everybody modify until matching the characteristics of the standard they are interested in. This means that after the release of LLCR DCC, the LLCR RENFE may follow, or SNCF, or whatever one choose.
At this point the content creator will follow the setup guidelines provided with the custom version he needs, and the final user must choose the right rule for his layout/route if he wants to be prototypycal or, he will go for the 'basic' version without loosing too much (assuming that customized LLCRs must maintain backward compatibility with the DCC one).
18-april-2004
LLCR version 1.2b uploaded.
New features:
- Tail lights turn off after stopping.
- Mesh lanterns are always visible even if the light is turned off.
- New option in control panel, choose if tail lights must light at day and/or if is raining.
Limitations about tail lights removed/changed from the list.
Added a new chapter about the future of the rule.
Generic revision of this document
17-may-2004
LLCR version 1.3b uploaded.
Update:
- Sp2 compatible.
- Now is working with portals.
- Minor changes to the code.